Showing posts with label One Piece. Show all posts

Monday, February 27, 2012

Katsucon 18: Part 2

      Friday morning and I still have projects to finish.  Kitana's fans need a cool symbol as well as the boots.  Luckily, the front of the Katsucon Program made a fine stencil when I cut it off and carved the Kitana symbol into it from this picture Kimi found and sized.  Next I painted the fans and boots, that would be 12 symbols, two coats each.  Quick zip out too the real world to pick up stuff for our party later and it's Cosplay time.  Yay, a One Piece photo shoot at the Gazebo.  Last year the One Piece gathering was by far our favorite.  This year is was nice although a bit more chaotic, there was a lot going on around the Gazebo.
Photo by Paul Karpey
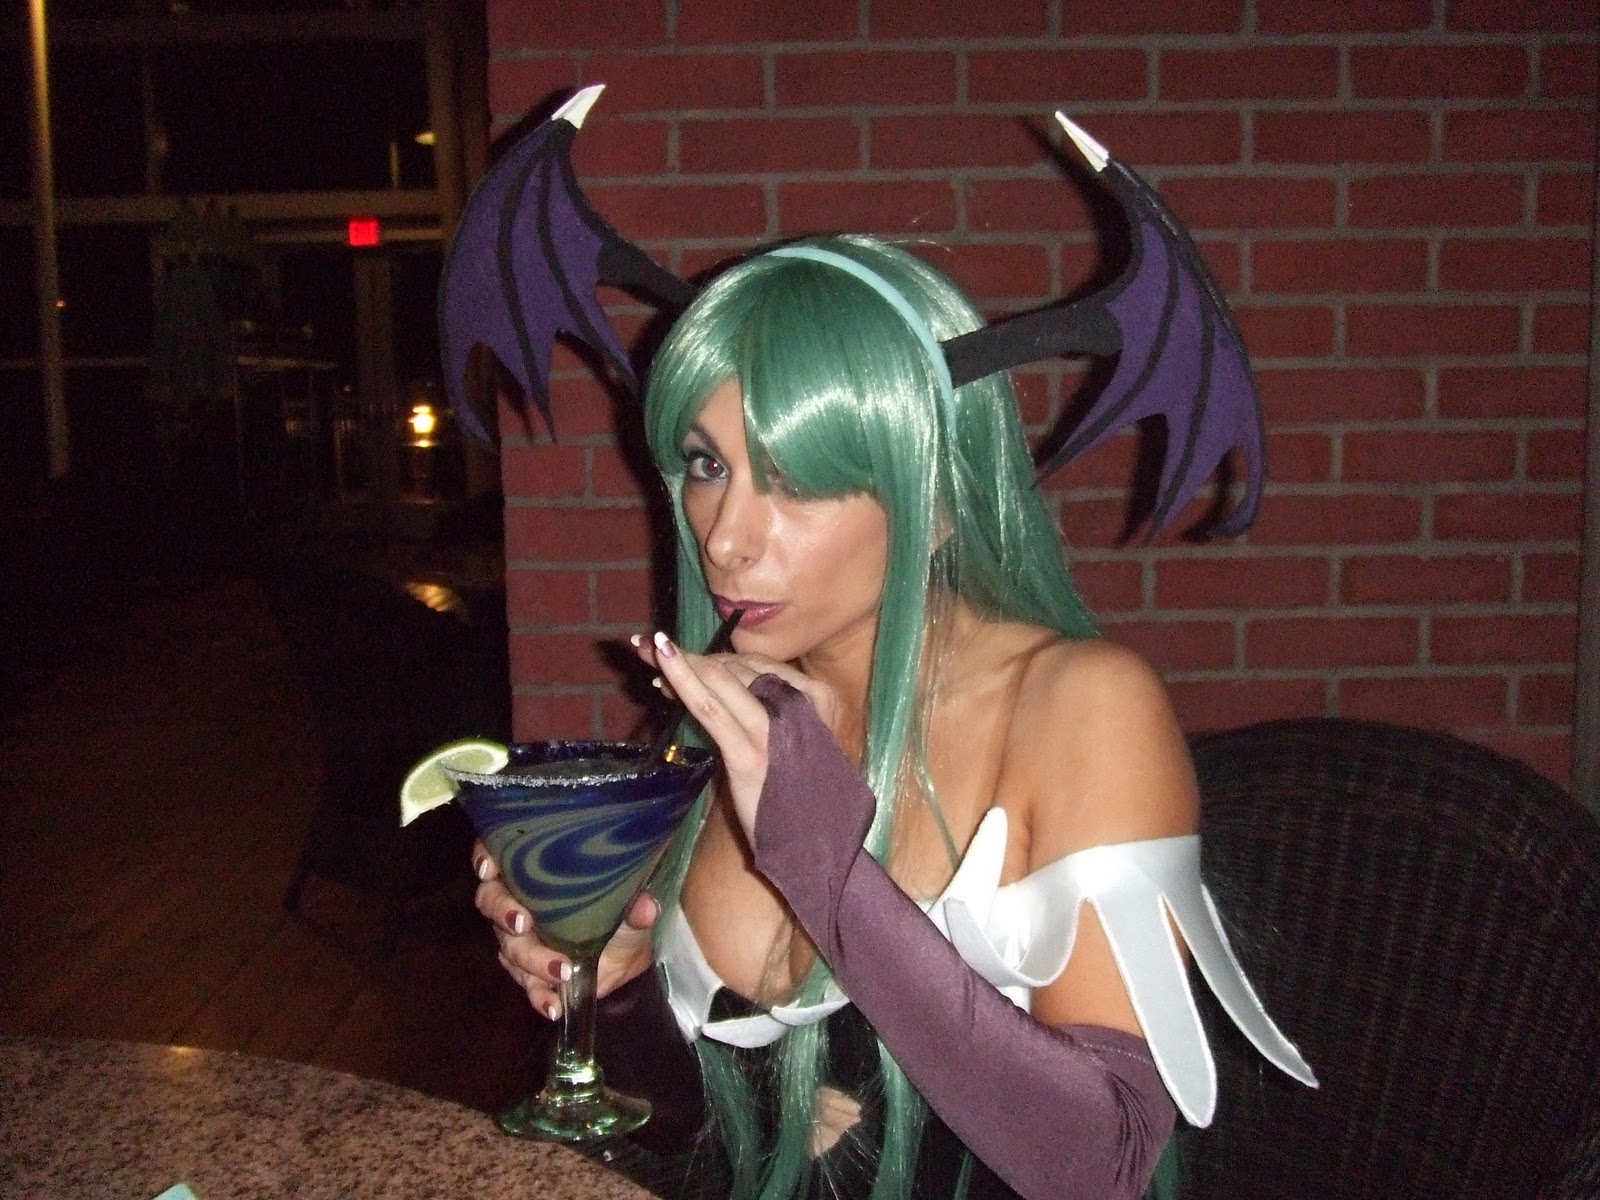
That was fun, but now it's party time.  Lot's of our good friends came to our little soiree, like Maki and Luis, Regina, Kat and Bill, EBK, Cooking Dojo Justin, just to start.  It was really cool, thanks for the scotch Bill. Nothing like Cheese, grapes and booze for all. Others put in appearances, but Kimi had to start getting all Kitana like.  Super talented make up artist Regina helped her get ready, then it was time for some Cosplaying.
Kimi as Kitana, Cammy Bitches as Cammy, and Maki as Jade.
Kimi wore her Kitana from Mortal Combat and Maki was Jade.  We met up with EBK and went down to the Secret Wall to do some crossover pics with a super cool cosplayer whose badge read "Cammy Bitches."  Awesome.  Anyway me and Luis pulled up a couple of chairs and had a grand old time.

Just one more picture.
 A really nice set of pictures.  On to the after party.  We ran into Regina and another friend of ours Charlene on the way back to the room.  Since we had so much cheese grapes and booze, we invited them up.  EBK then brought his friend Athel Cosplay up and an epic time was had by all.  A great con so far, but much more to come.

Thursday, March 24, 2011

Project: Straw Hat Pirate Flag

      Most of this is similar to the Kuja Pirate Flag I made so this will be some pictures and notes.  First I found a good picture on the net.  I then sized it so it was 6 inches tall.  This way one inch on the screen corresponds to six inches on the 36 inch flag.  It makes it easier to lay out, by far. So I would measure every thing on the picture and blow it up.Again I'm drawing on file folders to make a rigid pattern.

This was more of a challenge and took way longer to lay out than the Kuju Flag.  But a lot of it was still circles. A compass and a straight edge were my main tools. Once I got the basic shape I then separated all the pieces with an 1/8 inch gap. You can see it's done at the top of the picture, but not with the teeth yet. Once I had it all laid out I had to cut out all the pieces. I was very careful to label each piece with the color they are supposed to be, and the teeth with their location. So now I had to attach the Heat n Bond to all my different colors, then place my patterns on them and cut em out. And I made a classic mistake. Most pieces have no side they work either way, but the teeth need to be laid out backwards to work. I cut out a set the wrong way. Doh.

Here I lay out my patterns, trace them, and cut them out.  I found that cutting out the eyes and nose was easier if I stuck a sharp knife into the piece and turned the piece into my knife.

It's safer cause the knife is stationary and it seemed easier and more accurate.  You do need a very sharp knife, in this case a utility knife with a new blade.  The surface I'm working on is a piece of cork laminate flooring, a very good surface.  Anyway, I cut it all out, time to lay it out on the flag.

First thing is find where the center of the flag is with a tape and put the part of the skull between the eyes right there. I worked my way out from the center, to the hat then the teeth, then the bones. To try and orient the cross bones I laid a straight edge across the whole flag. So I ironed away and here is the result.

The photo looks pretty good, but the light colors on the black don't look quite as good as the black on red of the Kuja Flag.  I still think this is pretty cool, and though time consuming, not all that hard. Maybe a thicker weight nylon might look a bit better against the darker colors. I'll let you know, but making flags is cool. Next, some cosplay weapons.

Monday, March 14, 2011

Project: Kuja Pirate Flag

      To spice up future photo shoots I wanted to make some of the very cool pirate flags from One Piece.  Since we do Luffy and Boa Hancock, we need a Straw Hat Pirate Flag and a Kuja Pirate Flag.  I decided to try the Kuja Flag first because it was just 2 colors.  First off, you have to have a good picture of the design.  Well you can find one by doing an image search.  I just happened to have a nice picture on the side of the box of the Boa figure we got at Katsucon.  So I took that scanned it and then cropped and expanded the pictures until they were around the size I needed.
Little Boa, the design from the box, and one of the snakes blown up to the right size.
Of course I forgot the important first step.  I went on eBay and ordered a 3' by 5' red flag blank.  You could sew one but the blank was $12.75 and smaller ones are even cheaper. Someone just put a bunch on eBay for 4 and 5 bucks, look up flag blank.  3' by 5' is a pretty big flag.  I wanted the design to almost go to the edge of the flag, so I figured the skull would be about 15", + a couple inches for the teath, and each snake about 8.5".  With some spacing that's about right.  You could of course play with the proportions a little.  So I had a snake pattern, now I need a skull.  Its just several circles with teeth, so I just need the bottom part and it's easy enough to extrapolate the rest.  So I blew up a picture of the bottom of the jaw and cut it out.

I traced that design onto 2 file folders taped together. Then with 2 different compass' I drew a 15" circle for the head and the smaller circles for the eyes and nose.
I used a regular little compass and made a compass for the big circle with a paint stirrer, a pencil and a sharpened pop-sicle stick.
So I laid out the skull, cut it out and cut out one of the snakes too.  Next step, use some heat n bond on some black nylon.  Heat n bond is an adhesive sheet that you iron on to fabric so that you can stick it on another piece of fabric.  You can get it at any fabric store.  What you do is iron it on to th black nylon fabric.  Then with the heat n bond stuck to the fabric you can then transfer, trace your pattern on to the heat n bond.  It has paper on that side that you later peel off, so it's very easy to draw on.  Then you just cut them out.
Skull and snakes ready to be ironed on.
So this project is not that hard and the finished product came out very well.

This picture does not do it justice it looks very professional.  I am super happy with the result and it was a little time consuming, but pretty easy.  Believe me you can do this.

Thursday, March 10, 2011

What We're Watching: One Piece

      Well, we've gotten ourselves deep into the colossus that is one Piece.  There are currently something like 500 episodes and counting.  Not the kind of commitment I wanted to make, but once you get in it's hard to stop.  The thing is, it's a very easy show to watch.  It's a colorful, fun, larger than life  show But, even though you can go through episodes pretty quickly, there is an awful lot there.  It really turns out to be a rich world that  keeps expanding before your eyes.  There's a real advantage to the ocean full of islands world.  Th scenery changes and they can explore different areas, characters and ideas.  That's part of the charm of the show, but like any good show it's very character driven. Besides the main characters, One Piece is rich in good characters that come in and out or only exist in one story arc.  It does start off a bit slow,  the fight between The Straw Hats and The Black Cat Pirates seems to take a long time.  After that the show seems to fly.  A combination between better pacing and our getting used to the show.  Anyway, we really like it and are about 100 episodes in.  It's worth a look.

Boa Hancock and Strong World Luffy


Friday, February 25, 2011

Katsucon 2011 Friday

      Boy we were working on projects right to the last minute before this one.  We only just managed to get to the Gaylord and check in before the One Piece shoot.  As Boa Hancock and Strong World Luffy, we rushed up to the Gazebo to find a very cool group of Cosplayers.  I was especially fond of Ramen Pirate who was also Strong World Luffy.  Things just flowed well,  a lot of great pictures were taken,  and everyone was totally cool. Also the gazebo when that area isn't crowded is a great location.  All this stood in direct contrast to a later shoot,  ( cough, cough Final Fantasy Sat.9pm, cough ).  Another quite helpful soul was the Straw Hat's musician Brook who, of course, provided music.  Really helped to set the mood.  Kimi did a YouTube video as a tribute.

That was such a great start to Katsucon, but we had some business in the dealers room.  I needed a new wig for Lantis.  First though, we went to the sports bar in the Atrium for a snack.  That place was not open last year, but we found it to be good bar food and was cheap compared to other food there.  Also our Bartender actually recognized our fairly obscure One Piece Cosplay and was very nice.  After a quick shopping trip we needed to get ready for Marvel vs Capcom. But here's a few cool Cosplayers we saw along the way.
Trinity  Blood

Great D-Gray Man group
Otome Youkai Zakura

A very cool outfit and an adorable little Kiki

Of course,  Kimi's Morrigan wig came in the mail Friday right before we left so it needed some work.  Very luckily,  Regena was getting ready with us,  and was a life saver with the wig.  Off to the Marvel vs Capcom shoot which was on the upper side of the fountain.  Now this is a great place for a photo shoot if you have say 10 or fewer people.  It's just too small and too crowded a space.  But, it was actually pretty well run, and the best was made out of a lousy space.  Those pictures have gone up on Marvel.com 

Group shot turned out pretty well.  All in all a good time.
We hung out for a while then went over to Moon Bay for some cocktails and food, see the other days post for Morrigan with a Margarita. Then we actually got out of costume to hang out at the bar and relax. We ran into Misato Katsuragi in the bar and Cobra Commander in the Lobby.


Misato


Cobra  Commander
Met lots of nice people, hung out, went to bed.

Thursday, February 24, 2011

One Piece Photo Shoot Katsucon 2011


This is the Vid that Kimi did for the One Piece photo shoot.  It's her first try so I think it came out quite well.  Thanks to everyone who made that shoot a great time.

Saturday, February 19, 2011

Yeah, Katsucon

      Getting ready for Katsu has been a big pain.  So many props and accessories to make.  Well we finally got here just in time for the One Piece shoot.  Kimi is lying down as Boa Hancock.  I did Strong World Luffy.
We wandered a bit then had to go get ready for the Marvel VS Capcom ACP gathering.  Pictures from that are going to be on Marvels Site to celebrate the release of the game.  We met up with Regina who did Felicia,  Kimi was Morrigan and I Donovan Baine.  Full reports later on,but let's close with Morrigan enjoying a cocktail.